Thursday, October 4, 2007

Viognier and Pinot Grigio Harvest in Virginia, Part 3

My last post left off with us finishing the crushing and destemming of the Pinot Grigio, pressing it off in the bladder press, and pumping it back to a stainless steel tank for eventual fermentation. I mentioned that Three Fox harvested the Pinot Grigio and Viognier on the same day this year, so after we had finished with the Pinot Grigio we had to turn right around and repeat the process for the Viognier!

Deja vu with the Viognier
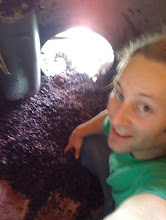
We went through the exact same process with the Viognier as I described for the Pinot Grigio - the freshly harvested grapes were dumped into the crusher/destemmer, where the resulting mixture of juice, seeds and crushed skins (called "must") was pumped into the bladder press. As you can see from the photo, Viognier looks much more like you would expect a "white wine grape" to look - green and gold, rather than the light purple of the Pinot Grigio.

Once the press was full, we closed the top and started inflating the internal air bladder. The one slight difference between our handling of Pinot Grigio and Viognier occurred at this step: with the Pinot Grigio, we inflated the bladder slowly allowing for some contact time with the skins in the press; the Viognier press run occurred more rapidly, with less time spent in the press in contact with the skins. The Three Fox winemaker/owner tells me that the additional skin contact on the Pinot Grigio leads to a richer color and lusher mouthfeel.

The pressed juice from the Viognier was pumped back into a separate stainless steel tank. We now had two tanks full of grape juice, and we were ready to start making wine!

The Numbers
For those interested in this sort of thing, we estimated our Pinot Grigio harvest at about 5,453 pounds (2.7 tons), which pressed off to about 456 gallons of juice. Our Viognier harvest came in at about 5,080 pounds (2.5 tons), and pressed off to about 381 gallons.

A little "wine chemistry"
So, now we're back in the winery with two tanks full of juice. When you're about to make some wine, there are really just three measurements you need to take to get all the information you need to know before starting off: brix, pH and "titratable acid" or TA. I feel we've covered brix pretty extensively over the last few posts. pH is a measure of acidity on a logarithmic scale of 1 to 14 (7 being neutral water - below that being acidic, above that being "basic"). Both our Pinot Grigio and Viognier clocked in at around 3.5 on the pH scale (we took the measurement with a digital pH meter in the lab).

A reading of 3.5 is pretty good - as you may recall from my cool graph two posts ago, pH starts rising as the grapes ripen. If your pH gets too high, it'll make the wines taste flabby (after all, we often describe the "acidity" of a wine when writing it up - acidity is what makes a white wine in particular sparkle on your tongue). If the pH IS too high, you might add tartaric acid (one of the three main acids often found in grape juice, along with malic and to a lesser degree, citric) to bring the pH down again. Luckily, 3.5 is a respectable number, and we could do what most winemakers prefer to do in these situations - nothing (why stand in the way of nature?).

The last measurement tells you about the "titratable acids", or TA in the juice. I just mentioned that wines often have tartaric, malic and citric acids to them (sidenote: wines that undergo "malolactic fermentation", or "ML" convert the crisp green-appley malic acid into a smoother "milky" lactic acid; many creamy Chardonnays have undergone ML). TA is somewhat related to pH, as pH does measure acidity, but TA specifically measures the amount of organic acids in the juice/wine. TA is what gives wine its "tartness". Our Pinot Grigio came in at 0.65 and our Viognier at 0.75. Our winemaker felt that both of these levels were good, and so we could again do what most winemakers prefer to do - nothing.

Get them Whites Fermentin'
S0, we have now determined that our grapes ripened well, and no manipulation was necessary in the winery to make some great wine. The only thing to do now is to add some yeast and get the fermentation going! As I mentioned before, our winemaker likes to use Lalvin D47 yeast for our white wines. We get our yeasts from Scott Labs, and it's really worth a look at their "Yeast Strains" website to get an understanding of what a huge selection of yeasts are out there. True, the main purpose of fermentation is simply to convert the sugar of the grape juice into alcohol, but different strains of yeast produce difference nuances of flavors into the finished wine, and it's only through trial and error that most winemakers find a "favorite yeast" that works for them.

At any rate, we added the specified amount of D47 yeast to a 5-gallon bucket with a couple of gallons of juice in it. Instead of adding the yeast directly to the tank, its good to "wake them up" from their freeze-dried slumber by adding them to a (warmer) smaller batch of juice so they are not immediately overwhelmed by their conditions. In a half hour or so, once the juice starts bubbling and fermentation is underway, you can then dump the bucket into the stainless steel fermentation tank to start the process in earnest. And this is exactly what we did with our Pinot Grigio and Viognier. Next up: how quickly do the yeast beasties munch on the grape sugars and convert them into alcohol? We take measurements of the fermenting wines, and perform some taste tests as well... More to come!

Tuesday, October 2, 2007

Viognier and Pinot Grigio Harvest in Virginia, Part 2

So I was out at Three Fox Vineyards again for Sangiovese harvest and crush (our first red harvest! - which I'll write about as soon as I catch up with the whites), so I was able to copy down some of the relevant info about the Viognier and Pinot Grigio that I skipped in my last post! So, to continue - we had just learned about how to tell when grapes were ripe enough for harvest in a generic sense. Now, I'll tell you about our grapes in particular, and how our harvest went...

Viognier and Pinot Grigio Harvest
We harvested our Viognier and Pinot Grigio (same grape as "Pinot Gris" - just the Italian name for it) on Friday September 7th. The fun thing about harvest is that it's pretty easy for volunteers to get involved - Three Fox invited their tasting room volunteers and Vintner's Circle members to come out and grab some pruning shears and get in on the action! We also employ a team of professional harvesters, whose speed leaves most volunteers in awe, but there are still plenty of grapes to go around!

At harvest, our Viognier had a brix reading of right around 23 degrees, while our Pinot Grigio was around 24 degrees brix - nice and ripe. In my last post I described brix as the measure of sugar in the grapes, and it is this sugar that will ultimately be converted into alcohol during fermentation. A brix reading of 23 degrees will result in a wine with ~13% alcohol, so that's about typical for most table wines. We would normally also take a reading of the specific gravity of the juice using a hydrometer - this is a much more accurate measurement than the hand-held refractometer we were using to take the brix readings - however, hydrometers are fragile creatures and a well-meaning volunteer had accidentally broken our last one days before.


At any rate, harvest we did. First up was the Pinot Grigio. As you will immediately notice, the interesting thing about Pinot Grigio is that it is a pretty darn "red" grape to make a white wine. "Grigio" actually means "gray" in Italian (and "gris" means the same in French), so the name of the grape literally means the "gray pinot" grape (as opposed to the "black" pinot grape of recent Sideways fame - Pinot Noir, and the white pinot grape, Pinot Blanc/Bianco). They are thus named because while we think of wines as white and red (OK, rosé too, but that complicates my example), those wines are made from white and "black" (not red) grapes, respectively. So Pinot Grigio's name is a tip off to the fact that it occupies a slot smack dab in the middle of the white to black grape continuum, and appears dark pink/light purple in color.

So, to explain the picture above (and the harvest process) a bit: the metal box on the right is a crusher/ destemmer - as the name suggests, this machine both de-stems the grapes (separating the grapes and spitting out the stems - look at all of those stems!) as well as "crushes" them (slices open the grape skins so that the juice flows out more freely). There is a pump in the bottom of the crusher/destemmer (winemaking, I'm learning, involves a lot of pumps) which pumps the crushed grapes up and into bladder press (the big white thing on the left). You can sort of tell from the photo that the press is a large cylinder made from a stainless steel mesh.

There is a central bladder running the length of the press; once the press is full, we'll start it rotating. The simple act of rotation is enough to start the juice flowing from the press (indeed, since the grapes have already been crushed, there is quite a lot of "free-run" juice that drains out of the press before we even begin). But to really squeeze out all the good stuff, we start inflating that internal air bladder. This forces the contents of the press against the steel mesh, and allows us to get almost all of the juice remaining in the skins. From the press, the juice falls into a trough where it is captured and pumped into a waiting stainless steel tank. In a little while, we'll add a specific type of yeast to kick-start the fermentation process.

But right now we've got some serious cleaning to do - while we've been pressing the Pinot Grigio, our volunteers and field crew have been harvesting the Viognier, and we've already got over a hundred plastic "lugs" full of grapes ready to go! Since we've got but the one set of equipment, everything will need to be cleaned from the Pinot Grigio before sending Viognier through the system. I'll talk about the Viognier and initial winemaking steps in my next post - that will be the third and final Viognier/Pinot Grigio Harvest: then we're moving on to Vidal, Chambourcin (from which we make our "port alternative" Rosso Dolce) and Sangiovese!

Tuesday, September 25, 2007

Viognier and Pinot Grigio Harvest in Virginia, Part 1

Our first harvest of the season at Three Fox Vineyards in Delaplane, VA occurred on Friday September 7th. It was a beautiful day, but the remnants of some tropical storms were supposed to blow through later that weekend, and we wanted to get the fruit off the vine before that happened. The last thing you want to have happen right before harvest is a big rainfall: the vines suck up the water and pump it into the grapes, effectively diluting their flavors at best, and possibly even bursting the fruit on the vine and losing crop. We had tested the fruit just a few days prior (more on that in a sec) and knew we were within the "harvestable" window, so rather than take the chance with the rain we decided to harvest perhaps a few days before what may have been the optimum time. This is not at all unusual, as especially in Virginia you are at the mercy of fickle weather systems and must adapt your harvest schedule appropriately.

Determining When to Harvest
To understand the decision of when to harvest, you need to know a little bit about how grapes grow and ripen. From the perspective of a winemaker, grapes go through two phases: an initial growth phase, during which time the berry size steadily increases, and a following ripening phase during which berry growth slows, sugar levels start increasing and acidity starts dropping (pH increases) [Ignore the anthocyanin in the cool cool graph I stole from the Texas Cooperative Extension page]. The transition between these two phases is called veraison - this is a French term which means "change of color of the grape berries". The berries start softening, and their color starts changing from fresh growth green to the color appropriate for their varietal (i.e., "red wine grapes" start getting reddish purple, "white wine grapes" start getting yellow-gold). Shortly after veraison is when you want to start taking readings of the sugar levels in the grapes to gauge how the ripening process is progressing.

Sugars levels in a liquid is measured in brix. The unit of measure- ment for brix is "degrees", so when you take a brix reading of the grapes, you'll record a result of something like "19.5 degrees brix". To take a brix reading of the grapes, you first walk around each "block" of vines (Three Fox "blocks" are 30 rows long) in the vineyard, and take a random sampling of 15 or so grapes. This random sample should include grapes from the beginning, middle and end of the vines, as well as from both of the East and West facing sides of the vines (Three Fox rows are oriented N-S). You then allow the grapes to rest a bit, and cool down to 65 degrees F or so (winery temps). Then you mash them up and use a refractometer (or fancier instrument, but a refractometer gives you a precise enough reading at this point) to measure the brix by placing a couple drops of the juice on the plate and looking through the viewer and taking your reading.

So, we had done this with our Viognier and Pinot Grigio a few days prior, and knew that we were within the "harvestable" window in terms of brix levels (I don't have my notes, so I can't tell you exactly what the brix levels were, but they were in the low 20s). Thus we decided to harvest the fruit before a possible storm could negatively affect their quality.

Next Up: Harvest and Crush
I think this has been a rather scary post for the non-technically inclined, with lots of weird terms like "brix" and "refractive index" thrown into it, so I'm cutting this one off. My next post will detail the harvest, crush, press and yeast addition to start off the fermentation of the Viognier and Pinot Grigio, and will have cool pictures rather than boring graphs!

A Mini-batch of Chardonnay

After our final bottling of the 2006 vintage at Three Fox, there was much cleaning of tanks and re-arranging of the winery that had to occur. Since our indoor temperature-controlled space is pretty limited, we had moved several (empty) stainless steel fermentation tanks outside to make room for the oak barrels that we aged the red wines in. Now that those barrels, too, were empty after bottling, we had to reverse the process, cleaning out the oak barrels with soda ash and moving the stainless steel tanks back inside.

Easing into the 2007 Vintage
The first harvest to come in was a small batch of 800+ lbs (not quite half a ton) of Chardonnay. Grapes come in to the winery in small, sturdy plastic containers called "lugs". Each lug holds approximately 30 pounds of freshly harvested grapes. (I have since determined that lug is a very appropriate term, as you spend a considerable amount of time and effort lugging them around!) Lugs are filled to just below the top of the container such that when they are stacked, none of the grapes get squished by the container above it.

Whole Cluster Press
For this small of a batch of grapes (~800 lbs), we have to use a small 1/4 ton press as there isn't enough mass to sufficiently fill our (much nicer, faster and exceeding less messy) 3 ton rotating bladder press (I'll show you this bad boy in subsequent posts). The "technique" we used for this Chardonnay was "whole cluster press", meaning the entire grape cluster (grapes, stems and all) are all dumped into the the press. An alternate method sometimes employed for whites is to send them through a destemmer first, to gently jiggle all of the grapes from the stems, and then only the grapes are pressed. Or, you may send the grapes through a crusher/destemmer, where the grapes are first destemmed, then crushed - breaking the skins and allowing the juice to flow freely out of them - before being pumped into a wine press. This last method is the one we used for our Viognier and Pinot Grigio, and I'll describe it in a later post.

So, here's a picture of the small 1/4 ton wine press we used for the Chardonnay. Grapes are simply dumped into the top of the press, which has a large bladder in the center of it. It's a bit tricky to see the actual press in this picture as it's been wrapped in plastic, but the wine press is made of wooden slats with a small space between each slat. These had been soaked in water for a day or two prior to use so that the wood has absorbed some water and swollen in size, pressing close together. Typically, you line the inside of the press with a mesh screen, which prevents grapes and seeds and things from squishing through the wooden slats, clogging them up and making a mess. We did not have such a screen available, so wrapped the outside in plastic to catch the "burps" of grape skins and seeds that would occasionally squirt out during press.

In the center of the press a large rubber bladder which will eventually be filled with water (this is a hydraulic press - our larger press is pneumatic and uses compressed air which is much faster). As the bladder expands, the grape clusters are pressed against the wooden slats, breaking them open and forcing the juice from the grapes. The juice runs down to the bottom of the press, where it is collected in a clean bucket. We then carried the bucket to a stainless steel fermentation tank, and carefully poured it in. Voila - we're ready to start making wine! And the only thing we need to do that is some yeast.

Fermentation
Since we want to end up with wine and not grape juice, we employ yeast to convert the sugar in the grapes into alcohol in the process of fermentation. Yeast occurs naturally in the environment, and there are generally several strains of yeast living on the grape skins, in the winery, everywhere. It is possible (even likely) that if we did nothing at this point, our grape juice would start fermenting naturally from the "wild" yeasts of the vineyard. However, each strain of yeast has its own characteristics and ferments in a slightly different way, some proceeding faster or slower, some producing hydrogen sulfide or other unpleasantness, having different alcohol tolerances, etc etc. Thus most winemakers like to stick with a known variable and add in a specific strain of yeast rather than take a gamble and see what happens to develop.

There are numerous strains of yeast commercially available to pick from. The type of yeast we used for this Chardonnay is called Lavlin #D47, which is especially recommended for white varieties. Much like the yeast you might buy from the grocery store for baking, D47 comes in packets in a powdered form. To determine how much D47 to add, we multiply the volume of grape juice in gallons by 0.75, and the result is the number of grams of yeast to add. The yeast is not added directly into the stainless steel tank however - you must first "wake up" the yeast from their powdered dormancy. To do this, we filled a bucket with a couple of gallons of the pressed juice, then added the entire amount of yeast for the whole batch into the bucket. We stirred this up, then let it sit for about 30 minutes.

When we returned, the brew was bubbling nicely (the result of the yeast releasing carbon dioxide) and the smell you would normally attribute to baking bread was in the air. Thus we knew our yeast had taken off and were happily munching on the grape sugars, so at this point we are safe to pour the bucket of yeast into the tank full of waiting juice. And that is largely the end of the story for this Chardonnay for several weeks, until the fermentation has concluded (i.e., all of the sugar has been converted to alcohol, resulting in a "dry" wine and killing off the yeast for lack of food) and we start racking the wine from tank to tank to remove the sediment ("lees"). More on that process in a later post. Next up: Viognier and Pinot Grigio!

Wednesday, September 19, 2007

Makin' Wine in Virginia...

So you may have noticed my posting frequency dropped off a cliff. After a fun summer of vacations, I was ready to get back into the thick of it when an opportunity came along that I just couldn't pass up: starting in the end of August, I have been working as a part-time winery assistant for Three Fox Vineyards! Luckily I have been able to work some flexibility into my "day job" so that I can work at Three Fox on Wednesdays and Fridays (and my wife and I both continue to work periodic weekends)!

This has been an amazing learning experience for me so far - I started just as harvest season rolled around, and there certainly has been plenty to do! So I think I am going to start posting about the ins-and-outs of working at a small, family-owned winery during harvest for the next couple of months. I think this should provide whatever readers have stuck with me through my summer hiatus with an interesting and educational look at winemaking in Virginia.

Out with the Old, In with the New
One of the first things we had to do in preparation for the coming harvest was bottle up the remaining 2006 wine! We'll be needing those tanks and barrels that the wine is sitting in for this year's fruit, so time to bottle everything up. It doesn't make sense for a small (~3,000 cases per year) winery to own their own bottling equipment, and so what most folks do is rent out a "bottling truck". If you saw this thing driving down the highway, there's no way you would think it contained a mobile bottling lab!

It's a bit of a tight squeeze on the inside, with a bottle washer, wine dispenser, corking machine, foil - adder - and - heat - it - to - shrink - it machine, labeler, and conveyor belts everywhere (no, I have no idea of what everything is called, but it's fascinating to watch!). And let me tell you, this thing really MOVES - we were pumping out a case of wine approximately every 10 seconds! "Frantic" only begins to describe the sense of urgency you feel as more than one bottle a second is hurtling down the line at you, to be yanked from the belt and shoved into boxes by hand - there is literally no time for mistakes. Luckily, bottling is an entertaining enough event that we had a good crop of volunteers there, so someone could step in and swap out positions once the repetition of whatever it was you were doing started getting to you.

I don't have the exact numbers right now, but we ended up bottling several hundred cases of wine in the matter of a few hours. Not bad for a days work! And now all of our stainless steel tanks are empty and ready for cleaning in preparation for fermentation.

Timeline
So this final bottling run actually occurred in late August. Not to ruin the surprise, but we have already harvested our Viognier and Pinot Grigio and pressed them along with a load of Vidal from one of our growers and started their fermentations, and we've also received a load of Chambourcin grapes from one of our growers which we crushed and started fermentation. None of the other reds are ready for harvest yet, so I have a bit of a breather in which to catch up to the present with my posts. My next post will discuss how we determined when the Viognier and Pinot Grigio were ready to harvest, what goes on during harvest, and what wine chemistry we performed on the newly pressed juice prior to fermentation. So stick around - it should be an interesting next couple of months!